Monday, October 1, 2012

Unlikely nail polish tools

The inspiration for my nails this past week came from combining a few different pin-spriations...


The different techniques and tools that I used were painters tape and a sharpie.

First I started by putting lotion around my nails on my cuticles.  This is a two-fer deal!  My cuticles are conditioned, and if I happen to get any nail polish outside the lines, it can simply be wiped off.


I always add a clear base coat before any color.  I am a constant polish-picker.  So if my nails chip, I am able to peel off large pieces of my polish, and sometimes completely remove it.


To apply the painter's tape, I cut it into small strips.  Again, like my previous post while using reinforcement stickers, you'll need to take some of the stickiness off of the tape.  Painters tape is designed for painting walls, so even though it comes off of your wall smoothly, it can still take off your nail polish!

Once your tape is in place, go ahead and paint away!


I used the tape 2 different ways (only one is pictured).  The first way, as shown, was to paint with the tape covering my plain nail.  Then once my paint was dry, paint the top half of my nail, being careful not to leave any space between the paint.  This technique was a little difficult, and required a steady hand, however looked nice.  On my other hand, I painted my nail with a full base color, then used the tape to paint the top half (shown in the photo below).  Both techniques worked well for me.


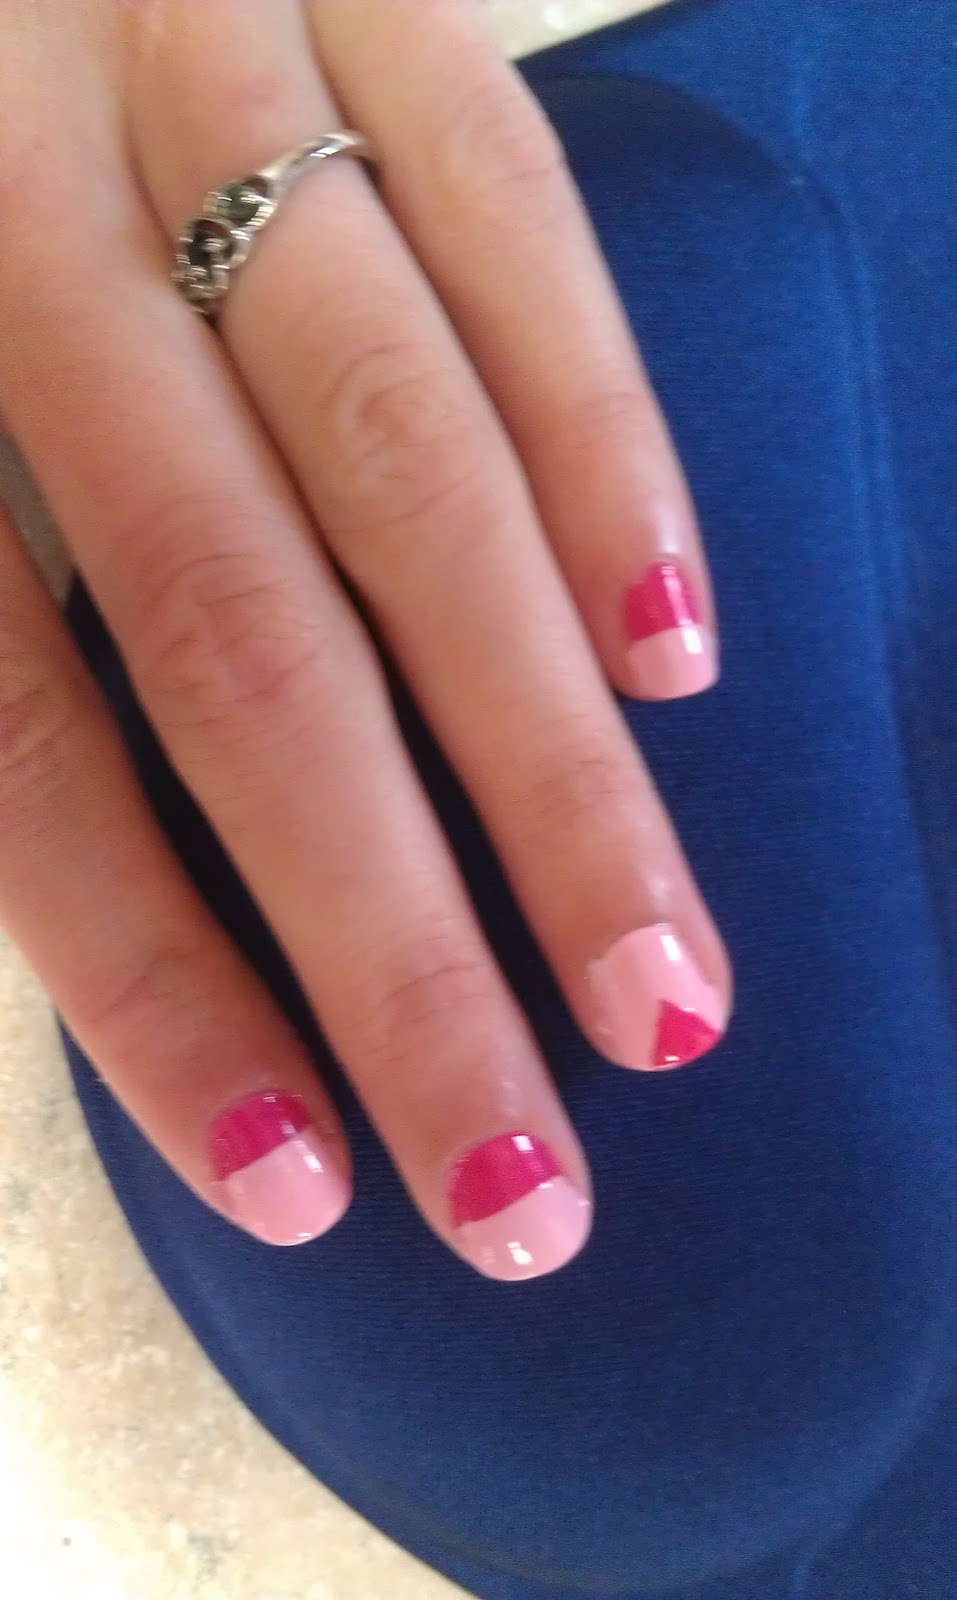
After my nails were dry, before finishing with a final clear topcoat, I decided to add a little dimension to my nail by lining the different nail colors.  I had originally tried to do this with a bright blue color and a toothpick. That did not turn out well at all.  The results were me starting all over again!  So I found a fine-tipped sharpie  at work, and referred to one of the pins I had seen.  Using small strokes, I was able to create the look I wanted.  I waited for the ink to dry, but whenever I added the final clear top coat, the sharpie ran a little.  I liked how it looked, so I wasn't discouraged at all!


The color combinations and geometric designs are endless.  This was so easy and the result looks professional!  I was asked many times where i had my nails done!


Don't forget to follow my pinboards, and comment with any suggestions!!


Wednesday, September 19, 2012

~ Creating Waves ~

When I want curly hair, I make sure that I begin getting ready about 45 minutes earlier than I normally would.  I grab my trusty Scunci claw clip, put up half of my hair and begin with a large barrelled curling iron. Half an hour, and half a head of hair later, I'm already thinking of heating up my straighenter and giving up.  Also, I can never create the look I want, it always looks the same.  To sum it up, curling my hair is a hassle.  Then I saw this pin:


Who would have thought it would be so simple to curl your hair?  I had to give this a try!


I started with my favorite straightener that gets really hot (sorry for the bad lighting in the pictures, my bathroom isn't very picture friendly).


I do have to admit that this was my second attempt at this hairstyle.  So when sectioning off my hair, I decided to use large sections for a bigger wave look


I started by brushing out the section of hair so my curls would be nice.


Then simply twist!  How tight or loose you curl your hair will create a different look.  Tighter = smaller waves, or a more crimped look; Loose = wavy, relaxed look


Since I used a thin straightener, I tried to angle it along the twist so I covered as much hair as possible at once.  I would recommend using a straightener with wider plates.  You can either hold the straightener in place for 10-20 seconds then move down, or slide it down the twist multiple times.


After you finish with one twist, leave it together as you do the other sections of your hair.  As your hair cools, it will hold the curl in place.


This twist of hair had a lot of little pieces sticking out, so as I ran my straightener over it, I twisted it around my hair to curl them.


After I finished all the sections of my hair, I brushed my teeth, and continued getting ready for work with the twists still intact.  Right as I was ready to leave, I separated the twists by running my fingers through them.


The sections that I twisted that were larger and more loose than the others, turned out exactly how i wanted  them, wavy and loose.  the smaller sections looked a little frizzy and like a crimp style gone wrong.  don't worry I redid them for work.  I'm definitely going to continue to perfect this way of styling my hair.  It is so simple and doesn't take a lot of time.  I recommend it!

Don't forget to follow my pinboards and suggest something for me to try!!


Friday, September 14, 2012

DIY French Manicure

I've always loved the style of a french manicure, but never had a steady enough hand to create one myself. Then I came across this post:


Lucky for me I work in an office, so these reinforcement labels were not hard to come by.

Although I love the neon trend, I decided to go for a few different colors for an updated fall look.
The clear is OPI's Start to Finish, which doubles as a base and top coat.  I always use a base coat for easy removal (and my nervous habit of picking my nail polish results in picking it off cleanly and faster).  The blue and gray are both from the L'Oreal Color Riche collections.  I really like these nail polishes over others like OPI, or Essie because the color is thick, so less time spent applying multiple coats of one color, and they go on pretty smooth also.  The Blue is also a little brighter than shown, called "Jet Set to Paris" and the gray (my new fave) is Greycian Goddess.


1) First step is to dab lotion or Vaseline around your cuticle, a tip I also found on pinterest.  This allows you to simply wipe off any mistakes and also moisturizes your cuticles! Two birds with one stone!

2) Now that your nails are prepped, you can go ahead and either paint the color you want on the majority of your nail, or, if you're going for the look pictured above, skip to step #4

For tips on how to paint your nail smoothly and evenly, check out this pin!
Pinned Image

3) Now that you have your first coat of nail polish on, if necessary, apply a second coat to get the color that you want, or continue on. Allow your nails to dry completely! If you don't, you could really mess up all the work you've already done. 

4) Once your nails are dry, we can start applying the reinforcement labels.  An important tip to remember is to make the labels less sticky.  I did this by sticking all 5 of the labels to the back of my hand, then before sticking them to my nail, used my finger to make the part that will be touching my nail less sticky.

5) Apply the label to your nail.  I cut the ring so that there was more room for it to stretch a little and fit my nail a little better.  Also, run a fingernail across the edge where you'll be painting, and push it into your cuticles at the edge of your nail to try and seal the label.  In the many times that I have tried this, the edge is never exactly perfect, but that works best for me.
6) Paint the tip, being sure not to have too thick of a layer of paint.  If your base coat color still shows through, you can always paint a second coat on your tips after they dry.  A good tip here, is to remove the label shortly after you paint the tip.  If you leave it on too long (which I thought was a good idea at first) the paint dries onto the label and once you peel it off, it leaves a weird mark.


7) Apply a few thick coats of top coat onto your nail to even out the thickness, and there you go! an inexpensive way to have a french manicure!


Thursday, September 13, 2012

Welcome!!

Welcome to all Pinners and Pin-a-holics!

Like most of you, I spend quite a bit of time browsing the website Pinterest.  I was first introduced to the website when a sorority sister of mine, Nicole.  She told me that it was like a cork board of ideas.  At the time, I was asking her for advice on helping plan recruitment events for the sorority chapter I was an advisor for.  At first i was confused.  "So they're just a bunch of pictures?" Yep.  Just pictures.  As I started following more pinboards, and created more of my own... I was down for the count.  I had been sucked into the black hole that is Pinterest!  Now my Pinboards cover every category from Hair and Beauty to all things Harry Potter.  

What I'm going to use this blog for is to show you actual results of things I've found on Pinterest.  Such as how I learned to french braid my hair from a video I saw on a pinboard!

I hope this helps you to try these ideas for yourself! Good Luck and happy Pinning!